Guitar arpeggio
B Dominant 7 Sharp 9 Guitar Arpeggio
B Dominant 7 Sharp 9 is a five-note arpeggio built from B, D#, F#, A, and C##. It is also commonly called B Dominant Seven Sharp Nine and B 7 Sharp 9. Use it to study chord tones, interval formulas, and guitar fretboard positions.
- Chord tones
- B, D#, F#, A, C##
- Formula
- 1 3 5 b7 #9
- Semitones
- 0 4 7 10 15
- Chord symbols
- B7#9
- Also called
- B Dominant Seven Sharp NineB 7 Sharp 9
How to read this arpeggio
The chord tones are shown as pitch classes first. In the fretboard tool, square markers represent B root notes, while circular markers represent the remaining tones in the arpeggio.
Use the interactive fretboard to locate the B root notes and connect the remaining dominant 7 sharp 9 chord tones across standard tuning.
This same arpeggio shape is also commonly called B Dominant Seven Sharp Nine or B 7 Sharp 9.
Chord construction and defining tones
B dominant 7 sharp 9 is defined by 3 (D#), b7 (A), and #9 (C##). The chord retains its major third and flat seventh while the sharp ninth adds an altered upper tension.
Harmonic use
Use this arpeggio over B7#9, altered dominant harmony, and dominant sounds that deliberately combine the major third with the sharp ninth.
Practice this arpeggio on guitar
- Play the B Dominant 7 Sharp 9 arpeggio from one B root to the next in at least two fretboard positions, saying each note name and interval degree aloud.
- Play 3 (D#), b7 (A), and #9 (C##) in small groups and keep the major third and sharp ninth in separate octaves so both colors remain clear.
- Emphasize the sharp ninth over B7#9, then resolve it by semitone when the harmony changes.
Fretboard diagram
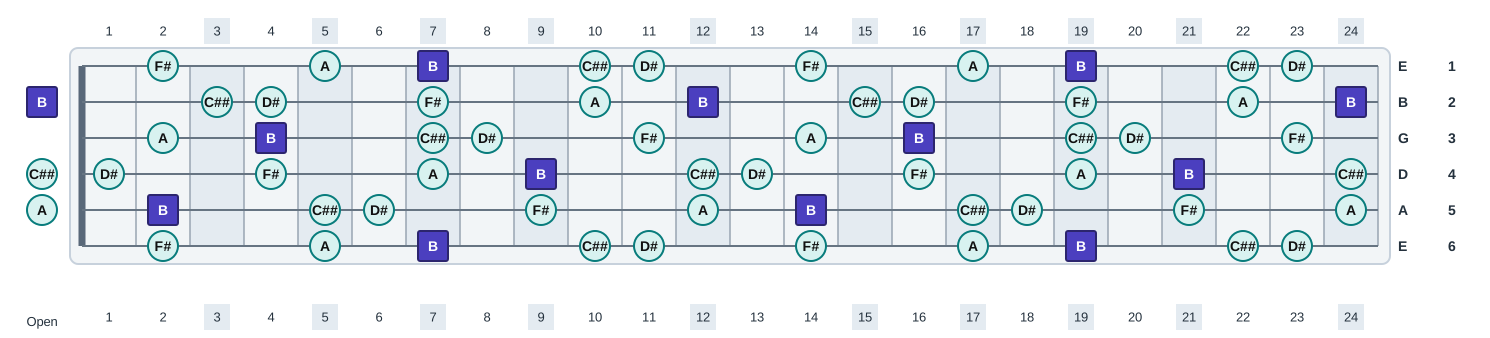
Open this arpeggio in the fretboard tool
Start with B Dominant 7 Sharp 9 loaded, then adjust tuning, labels, colors, fret count, and orientation.
Open in interactive fretboard