Tuning-specific arpeggio diagram
B Dominant 7 Sharp 9 Arpeggio in Drop D Tuning
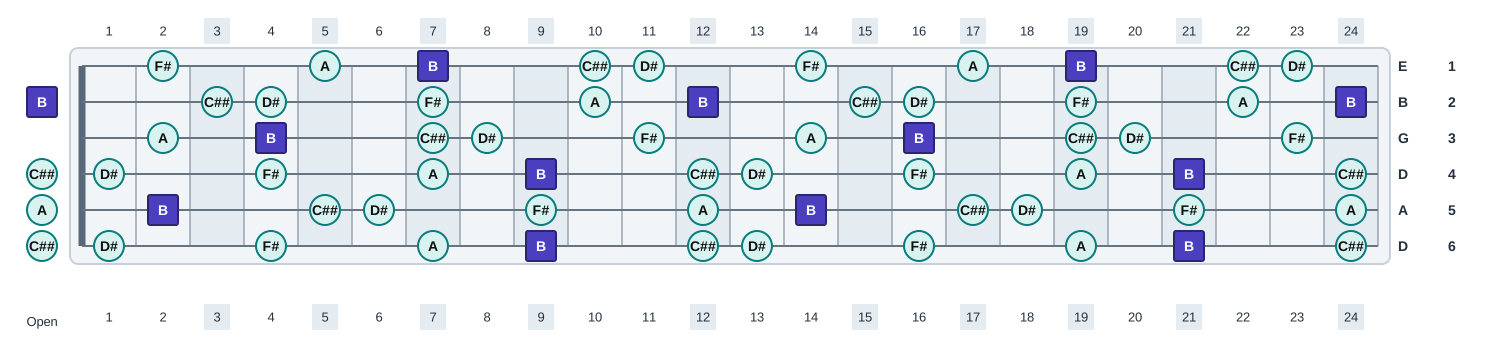
B Dominant 7 Sharp 9 Arpeggio in Drop D Tuning shows the same b dominant 7 sharp 9 arpeggio chord tones across 6 strings tuned D A D G B E. The tuning changes where the same chord tones sit across the fretboard.
- Chord tones
- B, D#, F#, A, C##
- Formula
- 1 3 5 b7 #9
- Semitones
- 0 4 7 10 15
- Chord symbols
- B7#9
- Tuning
- D A D G B E
- Strings
- 6
- Open pitch range
- D2 to E4
- 24-fret range
- D2 to E6
Open strings and root positions
4 of the 6 open strings belong to B Dominant 7 Sharp 9 Arpeggio: string 6 C## (#9), string 5 A (b7), string 4 C## (#9), and string 2 B (1). B roots occur on open string 2.
String 6C###9
String 5Ab7
String 4C###9
String 2B1
First root on each string
String 6Fret 9
String 5Fret 2
String 4Fret 9
String 3Fret 4
String 2Open
String 1Fret 7
Low-string pattern
On the lowest D string, the first-octave arpeggio pattern falls at frets 0, 1, 4, 7, and 9, with the B root at fret 9. On the highest E string, the first B is at fret 7.
OpenC###9
Fret 1D#3
Fret 4F#5
Fret 7Ab7
Fret 9B1
Practice this tuning-specific layout
- Play B Dominant 7 Sharp 9 Arpeggio on the low D string at frets 0, 1, 4, 7, and 9, saying each note name and degree aloud.
- Build a phrase that lets C## on open string 6 ring, then connect it to the nearest B root and two other arpeggio tones.
- Connect the B root positions on strings 6 through 1 at frets 9, 2, 9, 4, 0, and 7, adding the nearest arpeggio tone between each pair of roots.
Fretboard diagram
Open this diagram in the fretboard tool
Start with B Dominant 7 Sharp 9 Arpeggio and drop d tuningloaded, then adjust labels, colors, fret count, and orientation.
Open in interactive fretboardReference pages
Related diagrams in this tuning
Related scale diagrams in this tuning
Same arpeggio in other tunings
E Flat Standard TuningEb Ab Db Gb Bb EbD Standard TuningD G C F A DC Standard TuningC F Bb Eb G CB Standard TuningB E A D F# BDrop C# TuningC# G# C# F# A# D#Drop C TuningC G C F A DDrop B TuningB F# B E G# C#DADGAD TuningD A D G A DOpen E TuningE B E G# B EOpen D TuningD A D F# A DOpen G TuningD G D G B DOpen C TuningC G C G C EOpen A TuningE A E A C# E7-String Standard TuningB E A D G B E7-String Drop A TuningA E A D G B E7-String Drop G TuningG D G C F A D8-String Standard TuningF# B E A D G B E8-String Drop E TuningE B E A D G B E